Pages

The Foodie Blogroll

Showing posts with label Sandwich. Show all posts

What a beautiful morniiiingg.

Happy weekend everyone,

Hope all of your weekends were good!  Mine was spent relaxing (surprise there eh?).  My brother and his friend came down from Toronto, and spent a few days here.  I spent a good part of my time with them.  The rest of my weekend however was spent doing some biking, writing, and reading (my current read is Anthony Kiedis' biography, it is absolutely amazing!), and then we watched the whole season of The Walking Dead, love, love, love that show.  They left late Saturday evening, and I pretty much fell asleep right after they left.

This morning I woke up and was really looking forward to the day.  I'm not sure why I was looking so forward to this day, but I was in a really good mood and couldn't wait to get my day on the road.  I went and woke my mom up... okay not really waking her up, but I said "time to do the groceries?"  She said no, so I decided to lie in bed with her for a bit.  After taking another little nap it was time for breakfast.  I couldn't wait to gobble this breakfast down.

Yesterday morning, I received my daily blog email from Angela and came across a smoothie recipe that really caught my eye: Strawberry Cherry Basil smoothie.  I thought the flavours were very interesting, and decided I would make that.  My mom and I bought a basil plant last weekend, so I definitely have a large supply of basil on hand, and decided I would try my hand at this smoothie.  I have to say, I was a bit skeptical of not adding a banana to this smoothie, since banana's are a must in my smoothie, but it was perfect as is.  I have to say, this would be among my top five favourite smoothies.  I didn't have strawberries on me, so I used raspberries and it was just divine.  I loved it, and the subtle basil flavour (even though it's a 1/4 cup, it may seem like a lot of basil but trust me, and her that it works).

I went to do my groceries this morning and made sure to pick up strawberries so that I could try this smoothie with strawberries and compare which one I like more.  I have a feeling the raspberry one is going to be a winner, since I prefer raspberries to strawberries, but you never know.  We shall see when I make the smoothie!  But, I definitely think this is a beverage you need to try for yourself!

Raspberry Cherry Basil Smoothie

Recipe adapted from here


How gorgeous is that colour?

Ingredients:
  • 1/4 cup (or a bit less) loosely packed basil
  • 1/2 cup soy milk
  • 1 cup water
  • 3/4 cup pitted and frozen cherries
  • 1/2 cup frozen raspberries
Ginger Peach Smoothie


While we're on the topic of smoothies, I made a delicious smoothie for breakfast Friday morning.  I had finished my workout and decided I didn't want a heavy breakfast so I made a beverage.  I loved this smoothie, and at the time I thought it was one of the best smoothies I had in a while (which still remains true), but I definitely loved the Raspberry Cherry Basil smoothie a whole lot.  What I really like about this smoothie is the ginger.  I absolutely love ginger, especially when its freshly grated.  If you're not a huge fan of smoothie I wouldn't suggest putting 1 tbsp since some people (my mother being one of them) find the flavour of ginger very powerful.  Ginger is like cinnamon to me, I like it so that it's very noticeable, and always seem to double the original amount, or if there isn't any I will add it to a recipe and make it well known.  The ginger and peach pairing is definitely a great mix, they go together like peanut butter and jelly.  This smoothie is definitely refreshing and perfect for a warm day, even though there wasn't any protein powder (as I've run out) the addition of the flaxseeds definitely held me over until lunch.

Ingredients:
  • 1 peach, chopped to make it easier on the blender
  • 1 large banana, frozen
  • 1/2 cup milk
  • 1/2 cup water  
  • 1 tbsp ground flaxseed
  • 1 tbsp ground ginger
As for the rest of my day today, I did a teeny bit of reading, some shopping which to my surprise I didn't end up spending a single cent, which is probably a good thing.  I then headed over to my aunt and uncle's place for the evening.  One of my aunts and two cousins (mom's sister) were here visiting, and since I only see them once a year I decided I would go visit.  It was nice to catch up and see how much my cousins have grown up since I last saw them.  We had a nice dinner, they had delicious looking pizza, and I had fantastic couscous.

Yes, I am still on my couscous phase.  Seriously, I've been having it almost once a day for the past two weeks (and no I have not been posting all these recipes because I'm sure you guys would get sick of seeing them haha).  I thought I would share this one, because as simple as it is, it was wonderful and super filling.  I loved it, and regardless of me not eating this delicious, greasy, cheesy, meaty looking pizza my dinner was fantastic and healthy so I didn't feel like I was missing out on anything.

Vegetable Couscous Salad


Ingredients:
  • 1/3 cup couscous
  • 1/3 cup water + dash of salt
  • 1 corn on the cob, corn removed
  • 2 green onion stalks, chopped
  • Sweet red peppers, to taste
  • Nappa cabbage, roughly chopped
  • Sea salt and pepper
  • Reduced salt soy sauce
Directions:

Bring a medium pot of water to boil.  Add your corn, cook as you normally would.  I let mine come to a complete boil, and I cook it for seven minutes.  Set aside until cool enough to easily handle.  Once it has cooled, remove corn.

In a small pot over medium heat, add your couscous, water, and salt.  Bring to a boil and cook for 3-4 minutes, until all the water has dissolved.  Fluff with a fork.  I then added all my ingredients into the pot so I didn't get any other dishes dirty.

I then topped with sea salt, pepper and soy sauce, and devoured.

How did you spend your weekend?

    And it feels like...

    Friiiiday, Friiiiday, the day I look most forward to!

    Hope everyone's week has been treating them well.  This week surely went by quick, the Monday of the long week definitely aided in that, but I just feel like this week came and went like that.  I'm not complaining though.  Tonight will be my first night going out since I've gotten to Montreal.  One of the actor's/writer's is throwing a party at his place and well, it shall be fun.  I'm not sure what the rest of the weekend holds for me since the weather has just been hideous as of late, and is supposed to continue on this trend for a while, oh well it's good for the grass, the trees, gardens, etc... so we'll take it I suppose.

    One week until the 50 km bike ride that I'm supposed to be doing.  Unfortunately I've been procrastinating signing up because my mom isn't sure whether or not her body will be able to handle it.  Regardless I will be going because the other accountant is going so I'll be able to bike beside her, I just think it would be a really fun thing for my mom and I to do together.  I'm going to try and do both the Friday and the Sunday, it would be a good 80km or so in one weekend.  I've been biking everyday between 40-50 minutes.  I do 15-20 minutes in the morning (waking my mom up to the sound of the horrible stationery set), then I get home and do 20-30 minutes, depending on how much I did in the morning, how well my body can handle it.  It's been good so far, and I feel such an improvement.  I noticed it a lot while I was running and how long I could go for before I needed to stop, (it was about 4.3km before I needed to break and it'd been over two months since I'd run, so I have to thank the biking for sure).  I just hope the weather isn't as predicted and we actually get sun so I could finally take my bike out of the house and bike around Old Montreal and it's beautiful parks, but we shall see.

    This morning I decided to spend a few more minutes on my breakfast than I've been spending the past couple of days.  A little while ago I had made a peanut butter and jam overnight oats with banana soft serve, and I decided I would try it a different way this morning.  It was a little chilly in the house, even after sweating like a beast I was still cold, so I thought I would twist up the pb and jam oat breakfast.  I decided to make the banana soft serve as normal, then the oats, because I didn't think of it last night, I actually ended up cooking them on the stove.  The combination between the hot and the cold was utterly delightful.  Surprisingly the banana soft serve didn't "melt" and it stayed in tact with just a hint of heat.  It was super delicious.  I let the oats cook to how I like them (still a little bit hard) so it added some crunch, and it was just divine.  I really liked this breakfast, and will surely be making it again with different fruit's, spices and what not, yum.

    Peanut Butter and Jam Soft Serve Parfait


    Ingredients:

    For the oats:
    • 1/3 cup oats
    • 1/2 cup chocolate soy milk
    • 1/2 cup water
    • 1 tbsp peanut butter
    • 1/2 tbsp chia seeds
    • 1 tsp vanilla
    For the raspberry banana soft serve:
    • 1 1/4 frozen banana
    • 1 tbsp chocolate soy milk
    • 3/4 cup frozen raspberries
    Directions:

    In a small pot, over medium heat, add oatmeal, milk/water, chia seeds, vanilla, and peanut butter.  I let mine sit for approximately 4 minutes, that's the consistency that I like.


    In the bowl of your food processor, blend your bananas and soy milk until your ice cream consistency is reached.  Then add your raspberries and blend until combined.

    In desired glass, layer your oat mixture, berries, oat mixture then berries again, top with extra berries if you desire.

    Dig in and enjoy :)

    Open Faced Tomato Sandwich with "Cream Cheese" Spread


    Before I continue with what I had for lunch I want to share a sandwich that I had last week that I just didn't get around to posting so I thought I would do so.  When I went to my aunts I came across this recipe book she had called Power Foods and the cover itself was so captivating I knew I had to make the recipe.  When I looked through the book and found the recipe what I loved was that the spread was made from tofu it wasn't even real cream cheese so I was rather impressed.  A lot of the recipes have meat in them, but if you sub it with tofu I'm sure the recipes would be good, but a vast majority of the recipes are vegan which is awesome.  The book is so colourful and the pictures are wonderful, the recipes are incredibly easy to follow again.

    This open-faced sandwich was absolutely delightful.  I was so glad I tried it because it just, mmmm perfect.  It was so simple to make, every single bite was oh so delicious and I will definitely make this again.

    Peanut Butter and Chickpea's Sandwich

     Now for what I had for lunch, if you can think back to a couple of months ago I had experimented with Dessert Hummus, and absolutely loved it.  Well the past two days I've been eating chickpeas like a mad man and I intentionally left some aside because I was planning on making some of that dessert hummus again.  However, last night I was too lazy after spending much of the night on my bike so I decided to simply add the ingredients to whole chickpeas.  Well, it might not of been smooth like regular hummus, but the taste was definitely there with some added crunch from the chickpeas.  I absolutely loved this "sandwich".  It was quick to prepare, and it was incredibly filling.

    Ingredients:
    • 3/4 cup chickpeas
    • 2 tbsp peanut butter
    • 1 tsp vanilla
    • 1 tsp maple syrup
    • 1 slice of ciabatta bread cut in half
    Directions:

    Mix all of your ingredients and spread onto your bread.  You can even add a layer or peanut butter onto the bread if you're feel really sassy.

    Enjoy :) 

    Back to reality...

    One thing that really lacks on my blog is a sandwich section.  It's one thing I've never eaten much of, and as well all discussed a couple of months ago, I hadn't even had a peanut butter and jam sandwich until that point where we discussed sandwiches.  While it was National Grilled Cheese Month, I made grilled cheese's but they weren't for me, and I only posted one.  However, over the weekend I made myself some ciabatta bread.  I had been craving ciabatta for a while, and I had finally gotten my jar of yeast from home so I figured what the hey.  

    Sitting in my fridge has been the soy cheese I bought about two months ago.  That's one thing I like about soy cheese is that it's shelf life is not like regular cheese and it lasts' forever, which is good, because I barely ever make meals that I need to add cheese too.  Rewind back three years ago and I'd never ever would of thought I'd be saying that, cheese was my diet.  I loved it on everything, in everything, alone, just, I loved cheese.  Now, it doesn't even phase me not having it in my diet, vegan or non, I just barely ever eat it.  I keep it in my fridge for those times where I decide to make myself pizza with regular toppings.

    This morning however, I had planned to make a grilled cheese.  However, another thing that lacks on my blog is stuff that has been friend... yes, even my grilled cheese, I decided I would health it up.  I added EVOO to the asparagus, but instead of making a typical grilled cheese, I decided to broil the sandwich.  To be quite honest, this was one of the most memorable "grilled" cheeses' I've ever had. 
    The bread turned out super crunchy from being broiled, the asparagus was such a wonderful touch to the sandwich, seriously, the roasting with the salt and pepper, so simple yet amazing.  I just loved this whole thing.  I felt like I should of been out on a patio with a cold glass of lemonade, instead I sat at the kitchen table imagining I was doing so, but it was rather delightful and quite a way to start the day!

    *Note: for the ciabatta bread, I took my recipe here, and simply added 1 tbsp black sesame seeds, 1 tbsp chia seeds, 1 tbsp caraway seeds and 1 tsp minced garlic
    Vegan Baked Asparagus "Grilled" Cheese

    Recipe inspired from here


    Ingredients:
    • 8-10 stalk asparagus (trimmed and cleaned)
    • 1/2 tbsp olive oil
    • Sea salt and pepper - to taste
    • Enough slices of vegan cheese to cover your bread (I can't remember the name of the brand I used)
    • 1 piece of ciabatta bread - sliced in half
    Directions:
    Prehead oven to 400 degrees F.  Toss the asparagus in the oil, sea salt and pepper.  Arrange the asparagus in a single layer on a baking sheet.  Roast in the oven until tender, about 10-30 minutes (mine were in there for sixteen minutes). 
    Note: Roasting time can vary greatly depending on how thick your asparagus is.
    Turn the oven onto broil.  Assemble sandwich and broil until the cheese has melted and the bread is nice and crunchy (my sandwich was in there for five minutes).

    Cobb Salad


    At the market over the weekend I had decided I wanted to try fiddleheads.  I found a recipe before going that I thought I would try out, and did some reading on how to cook them (and thankfully the recipe I found had proper cooking instructions).  Well hot dang fiddleheads are tasty, they reminded me of an even sweeter version of asparagus.  Plus the fact that they are just so pretty to look at with their spirals and all, I just really enjoyed it.  When added to the salad I made too it was a great mix.  One of my all time favourite salads are Cobb salads.  What I like about them is that they are just so versatile.  Since going vegetarian and then vegan it's a salad I've missed dearly since if I go to a restaurant and order it... it'll simply be lettuce, tomatoes and green onions... I am not paying $14.00 for a salad like that, so I figured I'd recreate a Cobb salad with the ingredients I was craving and that I thought would go well.  It was perfect.  It was such a hearty and healthy salad, and the fats did not come from chicken, cheese or eggs, bonus.

    Ingredients:
    • 5 large strawberries
    • 15-20 almonds
    • Fiddleheads prepared from this recipe
    • Lettuce
    • Spinach
    Directions:

    Arrange in desired manner.  I served mine with white balsamic vinegar.

    What are some of your favourite ways to spruce up a grilled cheese/Cobb salad?

    National grilled cheese month + crunchy Easter peanut butter eggs

    If there is one food that my friend Jenna likes, no no, loves it is cheese. Well, all cheese but ricotta that is. She loves it, by itself, melted, on nachos (another one of her crazy obsessions), in pasta, everything. Well, when the buzz was going around that it was National Grilled Cheese month, needless to say I asked her if she was hungry, and to my delight she was. Now, I've made this more than once now... and every time she sings with glee when she gets to bring each bite to her mouth.

    This is a simple sandwich (as are all grilled cheeses' unless you're seriously trying to do some weird fancy-stuff, and if which case you are, puh-lease who you trying to impress?) ...regardless. Oh well, this is very simple, easy to do on a busy weekday and it's a teeny tiny healthy? ;)

    Grilled Cheese Sandwich with Garlic Spinach

    Recipe by me

    Ingredients:
    • Large handful of spinach
    • 1 clove of garlic - minced finely
    • Salt and pepper to taste
    • Cheese to taste
    • 2 slices of bread - buttered on the exterior
    • Butter
    Directions:

    In a a medium sized skillet, melt your butter, once melted toss in your garlic, spinach, salt and pepper. Toss until wilted. While you wait for the spinach to wilt butter your pieces of bread. Arrange your cheese in the middle, once your spinach is wilted top onto your cheese. Squish the loaves together, return to the pan and continue as you would any regular grilled cheese sandwich ~ two minutes per side - of course you can veganize this with soy cheese/Earth balance, or cashew cheese, etc... up to you :)

    Crunchy Easter Peanut Butter Eggs

    Recipe by me

    Ah, Easter is quickly approaching, and to be honest I wasn't planning on making any treats or anything regarding Easter this year. My mom left for Montreal, and my dad's girlfriend is planning Easter dinner for Monday night, and unfortunately... by the time I get there they will probably be eating. To me that's okay though, I've recently gone full-vegetarian, so no more fish for me, and I don't want a different dish to be prepared just for me. What I'm planning is on making some tofu, and marinating it the way my mom used to make our turkey (is that morbid? Maybe a bit so, but it always tasted so good, that I really don't think this could let me down, we shall see though!). Nevertheless, I really wasn't planning anything. However, my creative juices have been flowing, and I've just been feeling very... well, needing to bake.

    A couple of weeks ago I bought soy-butter. I had planned on making a dish that required peanut butter, but because I had invited Jenna over who is severely allergic to nuts I figured why not try some soy butter. I had introduced it to her a while ago, but never actually tasted it myself. Well, now it's Easter, and for most people (other than Jesus) the other symbol of Easter is chocolate. Me it includes, fake white chocolate, or puffed rice cereal stuffed chocolate. However, when I was younger my mom always used to buy us chocolate bar mini eggs, usually being Reece's Peanut Butter Cups or Butterfinger. Seeing as I had half of a container left of soy butter, and my friend has never experienced a Peanut Butter Cup I figured I better introduce her to them.

    Well, what I did was, take the original recipe I followed here, from back in the day when I first had my homemade bite of love, and adapted it. I wanted some crunch, I wanted some flavour, I wanted it to be good. I mean, this is her first introduction to this wonderful creation and all why not make it a good one?

    ... a good one is an understatement though. These are by far much, much, much better than... store-bought peanut butter cups. Seriously, I regret trying them. I had one, I had two, I had three... I might of had some more, then I had a big tummy ache. When making or buying peanut butter, crunchy is something I just don't do, yuck! I hate when nuts are apparent in my foods, especially peanut butter. I just think it's really gross and unnecessary. The crunch from the Panko crumbs/coconut is something that just screams perfection. Seriously, these taste so good, it really should be a sin for something this easy, to have such an amazing result. These would be perfect mini-sized so that... well you have a huge, huuuuge batch, and hopefully they'll last longer than mine did... Mine made 14 medium sized eggs. This is something I will definitely be making soon, and we all know how much I like chocolate... considering the chocolate bar that's been in my desk for three months only has two tiny squares taken off, what? Serious.

    Ingredients:
    • 1 1/4 cup of soy butter
    • 1 cup icing sugar
    • 3/4 cup graham crackers
    • 1/2 cup Panko bread crumbs
    • 1/4 cup unsweetened flakened coconut
    • Milk/semi-sweet chocolate - as much as you need, I didn't measure it out since I was measuring by eye
    Directions:

    In a bowl mix together your soy butter, icing sugar, graham crackers, Panko bread xrumbs and unsweetened flakened coconut until everything sticks together and resembles the inside filling of a peanut butter cup.

    Start by grabbing a handful of mixture and forming these bad boys into eggs, or mini balls would work too if you're not artistically inclined in shaping (which I am not, but thankfully I got Jenna to help me!)

    In a microwave safe bowl, melt your chocolate. Dip your "peanut butter" filling into the chocolate. Set on wax paper/Silpat mat/parchment paper etc... garnish with sprinkles.

    Either let them sit out and harden at room temperature or speed it up by setting them in the freezer for ten or so minutes if you're like us and just can't wait to bite into them!

    Yum, homemade Peanut Butter Cup Eggs, how cute and tasty!


    Enjoy :)

    What kind of desserts will you be making for Easter?

    Breakfast is my favourite meal.

    I said it not too long ago and I'll say it again breakfast has recently and quickly become my favourite meal of the day. Okay yes, lunch and dinner have so much variety it's true, but breakfast's okay, there are so many different types of grains, and with those grains the flavour combinations that you can make are infinite. Honestly, the amount of oatmeal recipes I've tried lately, and even just come across on blog's are crazy, and they all look so delicious that I don't even think in a lifetime I'd be able to try all the different oatmeal combination's even if I ate oatmeal for breakfast, lunch, dinner, snack and dessert time. That's what I love about oatmeal though, and honestly how can you get sick of it? It's hearty, warming, filling, delicious, healthy (depending what you put it in of course ;) ), but even at that the benefits that come from oatmeal, my my. Of course I am not only eating oatmeal for breakfast, sometimes I am having wraps (as you will see), smoothies, micro-muffins, fruit and yoghurt, avocado soft serve, just to name a couple.

    Banana Ginger Micro-Muffin

    Recipe adapted from here

    I love banana bread, but then again, who doesn't? Those that are insane I suppose. To make a whole batch of banana bread is sometimes not the wisest of decisions, because when it comes to anything containing bananas I'm pretty much weak at the knees... I say that because you can have Nutella banana bread, walnut toffee banana bread, cinnamon chip banana bread, caramel banana bread, tropical banana bread, and the list goes on and on. It really does take a strong willed person not to devour a whole banana bread when it comes to combination's like those. However, to have banana bread in less than 90 seconds cooking time, and less than five minute prep time is just asking for it. How can you turn that down? It's individual portions, so you won't go all crazy and you can literally add whatever you want. Between all the breakfasts I have been eating lately this quickly creeped up the ladder and hit spot number one. It was fantastic. I altered it to how my mood was feeling that day and va-va-voom it was fan-freakin-tastic. I loved it. I literally did not want this breakfast to end. It was so simple to make. It was made in one dish, and it was warm just like you'd take out a fresh batch of banana bread I really couldn't ask for more, and it was for breakfast say what! Yes, I definitely, definitely recommend making this as soon as you can!

    Ingredients:
    • 2 tbsp flax meal
    • 2 tbsp whole wheat flour
    • 1/2 tsp ginger
    • 1/2 (heaping) teaspoon baking powder
    • 1 mashed banana (mashed REALLY well, until egg-y)
    • 2 tbsp maple syrup (or agave)
    Topped with:
    • Plain yoghurt - not shown in the picture. I shoved everything into my yoghurt container and made a giant mash, it was wonderful.
    • Almond butter
    • Banana
    • Coconut flakes
    Directions:

    Whisk together the dry ingredients in a small bowl (I used a whole banana instead of adding an egg). Set aside. Whisk together the wet ingredients in a small bowl. Add them to the dry. Mix incorporated, but don't over-mix.

    Spritz a mug (I just used a standard mug, no special size) with cooking oil. Plop in the muffin mixture, and place in the microwave. Heat on high for 90 seconds.

    Eat in the mug or let cool for 1 minute and gently drop onto a plate. Top with desired toppings.

    Tropical "Sushi" Rolls

    Recipe adapted from here

    Next was something that was equally as delicious as the above recipe. This was light, filling, filled with the tropics, easy to assemble and a breeze to eat. I loved it because it was incredibly healthy, and you wouldn't think that it was with the abundance of delicious flavours that your mouth is experiencing. I would certainly make this in a heartbeat, may it be for breakfast, lunch, snack or dessert. I loved it, and have been thinking of it ever since I made it the first time. I loved this because absolutely every bite hit me with a flavour that I absolutely love, and you cannot go wrong with that!

    Ingredients:
    • 1 banana
    • Pineapple chunks
    • Coconut flakes
    • 2 large Swiss chard leaves
    • 1 tbsp homemade peanut butter
    • 1 tsp amaretto agave nectar
    Directions:

    Spread the tablespoon of peanut butter into the crease of the leaf. Drizzle it with about a teaspoon of agave or skip this part and drizzle on top as you would with caramel or chocolate sauce.

    Cut your banana in half, and layer it so that it’s straight in the center of the leaf. Do the same with your pineapple chunks. Fold up all of the edges bottom edges, and then and wrap it up neatly from right to left.

    Slice into 3-5 pieces. Sprinkle with coconut flakes and agave nectar.

    Avocado and Strawberry Grilled Cheese

    Recipe taken from here

    Oh my goodness there are soooo many breakfast options! It's so hard to choose, especially when there are sandwiches - the possibilities with bread and all your fruits, vegetables, spreads, etc are endless, then there are smoothies again you can add powders, fruits, vegetables, spreads, juices, milks, oh my goodness, then again with oatmeal, then again with yoghurt, ah it's this never ending circle of infinite delicious possibilities. One sandwich that I was recently drawn to was an Avocado Strawberry Grilled Cheese Sandwich. This was so delightful. I used vegan Italian cheese instead of sliced cheese, and then used my Cinnamon Raisin Bread and gobbled it down. I decided to make it into a panini as well, to reduce fat from either the oil or butter you choose to use. I really enjoyed this sandwich. It was creamy, fruit, cheesy, filled with cinnamon and raisins, it was a perfect way to begin the day. This would be a delicious after-school/work snack, mid-afternoon snack, even a dessert possibility topped with a bit of icing sugar, scrumptious!

    Ingredients:

    • 2 slices of Cinnamon Raisin BreadItalic
    • Sliced vegan Italian cheese (or whichever cheese you desire_
    • Thinly sliced avocado
    • Thinly sliced strawberries

    Directions:

    Heat a panini press or skillet over medium heat. Layer the cheese, avocado, and strawberry slices in between two pieces of bread. Since my Panini press is non-stick I didn't use butter, but if yours isn't, either coat the outside of the sandwich with cooking spray or spread with a bit of margarine or butter.

    Place sandwich into panini press or skillet. Cook for 3-5 minutes, or until the cheese is melted and the bread is golden and crisp, turning halfway through if using a skillet.

    Banana Scramble + Strawberry Yoghurt Topped Toast

    I don't want to lie to you this was a sinfully delicious meal. It was so so so good, after having my first Banana Scramble I was hooked. I seriously fell in love with this breakfast. However, when I saw an idea (well I pretty much did everything the same), for a breakfast that had an open sandwich scramble, with another fruity yoghurt parfait on the other side of the bread I knew it was calling my name. This was heavenly. I had just done a huge work out so this was more than filling and was certainly rewarding. My kitchen was definitely a disaster afterward but I did not care, the satisfaction I got with each mouthful was so worth it. I love love love banana scrambles and am never let down every time I make them! Woo!

    Side #1:

    • 1 slice of Cinnamon Raisin BreadItalic~1/4c plain yoghurt
    • 1/4 tsp cinnamon
    • 1 strawberry
    • 1 tsp hazelnut agave nectar
    Side #2:

    Banana Scramble
    Heat a greased pan over medium [or a little lower]. Add all ingredients to a small bowl and mash with the back of a fork. Add more milk to reach desired thickness. Cook until browned + flip to brown other side.

    Toppings:
    What is your favourite meal?

    Open Wide.

    Now, I have mentioned before that I have never been one for taking initiative and making myself a sandwich. My mom never packed me peanut butter and jam sandwiches growing up. While going on trips, I never packed myself hearty meat sandwiches. I remember trying my first sub in grade two. I took a bite of my friends turkey sub, with Swiss cheese, ranch sauce, lettuce and tomato. Years later I then began to order those for myself, but those were practically the only sandwiches I ever really ate, unless it was packed with hot salami and cheese.

    However, since I am now making my own bread, and loving the healthy breads, I need to find more ways to eat the bread other than simply having it as toast. This has not only allowed me to get more creative in the kitchen, but it has allowed my palette to experiences combination of fresh vegetables, fruits and nuts that it may not of had before. I'm going to keep this post simple, saying only a few words for each, but there will be a delectable sandwiches, because I am getting hooked.
    The reason I am making a post solely on sandwiches is because it can get dull eating the same sandwich day in and day out, and sometimes it is difficult with all the possibilities out there to come up with something creative. So by seeing pictures of multiple sandwiches it can help inspire some fresh ideas!

    I have to admit one of the things I miss about not eating chicken are the boneless chicken wings. I used to be a huge, I mean huge fan of chicken wings. Hot, barbecue, peppercorn ranch, Parmesan dill, oh man I loved them. They were just so full of flavour. I used to not only order the small size of wings, nope I went for the large, did I also mention I was a big eater? Ugh... yeah, gross. Nonetheless, I have missed the flavour combination's and have simply missed the whole "event". People just always seem so happy while eating their wings, especially with their crispy fries with the dill dressing, yum!

    Honey Banana Whole Wheat Bread

    Recipe adapted from here

    Before I post the sandwiches, I want to post the bread I used in all of these sandwiches (but the banana scramble which was enjoyed with my ciabatta bread). Other than that, I had made a bread Honey Banana Whole Wheat Bread with various seeds. I loved this bread. It was so scrumptious, and not only that it had a lot of additional nutrients added, from the banana, chia seeds, and caraway seeds. Usually when you make bread for sandwiches, it's your standard white or whole wheat bread, but I didn't want that, therefore decided to added some extra health benefits to the bread. I loved it, and ate it every single day, as you will see from this post. When I first started making it, I was doing it in the bread machine, but really didn't like how it was looking. I've never used a bread machine before and was quite skeptical but my mom's boyfriend kept insisting that it was really good... I think it's because he's never made bread without the machine. I mean, yes, it is a handy tool, especially when you aren't always in the kitchen but I like making breads by hand and in the oven. I decided to take out the loaf from the machine, shape it into a loaf, and plop it into the oven at 350 degrees F for approximately 40 minutes; it worked like a charm and gave me a delicious loaf!

    Ingredients:
    • 2/3 cup warm water
    • 1 1/2 tbsp vegetable oil
    • 1/4 cup honey
    • 1 egg
    • 1/2 tsp vanilla
    • 1 1/2 cup whole wheat flour
    • 1 1/2 cup multi-grain bread flour
    • 1 banana, sliced
    • 1 tsp poppy seeds
    • 1 tsp chia seeds
    • 1 tsp caraway seeds
    • 1 tsp salt
    • 2 tsp dry yeast
    Barbecue Vegan "Chicken" Tofu Wings

    One of my favourite blogs (never home)maker (man I feel like all I've been doing is posting recipes from their blog lately... this is why it's one of my favourites, no matter what I'm craving I can usually find inspiration from their blog). I had seen many moons ago Vegan Tofu Wings, well needless to say I bookmarked that page right away! Today I was really craving a sandwich, but I knew I was making the vegan tofu wings today so I decided why not change the recipe up a bit and make a "boneless "chicken" wing sandwich", that is what I did.

    The sandwich was so freakin' good. I had a piece of tofu by itself before putting it into my sandwich. How did it taste? Exactly like a piece of chicken. I'm not saying this to "sell" the sandwich. No, it had the perfect spice, consistency, flavour and even gave you the smokey residue you sometimes get from barbecued sandwich. When I cut the sandwich in half, for a split second I forgot it was tofu and not chicken. It actually looked like white meat chicken. It was a perfect sandwich, and it made such a beautiful lunch. I will definitely be making this over again, or simply make it with the intentions of having it as wings and serving it with fries, delicious!

    I took their recipe for Vegan Tofu Wings, and adapted it slightly. This is what I did:

    Ingredients:
    • 1/4 block extra firm tofu
    • 1/2 tbsp canola oil
    • 1/4-1/2 cup of your favourite barbecue sauce
    • 1/2 tbsp soy butter
    Directions:

    Heat oil over medium-high heat.

    Drain tofu and cut into large strips (you may wish to press the strips with a paper towel to get excess moisture out). When oil is very hot, stir in tofu and fry until both sides are a deep golden brown. Melt soy butter and mix it in with the barbecue sauce. Pour mixture into a large, shallow dish. Put fried tofu into the dish and stir. Let sit for five to ten minutes. Then, heat in microwave for 30 seconds to 1 minute (this gives it a good, wing-y texture).

    Serve with vegan sour cream, blue cheese dressing, or ranch... whatever you like!

    Barbecue "Chicken" Sandwich

    2 pieces of honey poppy seed bread
    2 rainbow chard leaves
    5 pieces of your barbecue "chicken" wings
    Broccoli sprouts
    Cucumber

    Directions:

    Toast your bread to desired done-ness. Put your lettuce, cucumber, broccoli sprouts, barbecue "chicken" wings, and take the leftover sauce from the "chicken" wings and spread it on your bread. Cut in half, enjoy.

    Serve either warm or cold!

    Turkey Date and Walnut Panini

    Recipe adapted from here

    This is by far one of the most amazing sandwiches I have ever had in my life. I love dates. I could eat them for breakfast, lunch, snack and dinner. When I saw this recipe I knew it was made for me. It was glorious. It was sophisticated. It was classy. It was flavourful. It was healthy. It had a touch of alcohol. It had sweetness. It had nuttiness. It had perfection. I will be making this again, and again, and again I can guarantee you that. Oh, if there is one sandwich you need to make or try before you die, it is this one. Yes, that is such a strong thing to say but it is that good.

    Ingredients:
    • 1/4 cup pitted dates
    • 1 heaping tbsp walnuts
    • 1/2 tbsp white wine
    • 5 slices of tofurky "turkey"
    • 2 pieces whole grain bread
    Directions:

    Put dates, walnuts pieces, and white wine in the bowl of a food processor and pulse until it becomes a smooth, thick paste. Preheat your panini pan or press. Spread a generous portion of the date spread on one (spread on the dry side). Top with turkey and then the second piece of bread. Place in your panini press or pan and cook until golden brown. Cut in half and serve immediately.

    I didn't use butter, as mine is non-stick and I've never had a problem with it sticking before.

    Banana Scrambles
    Recipe taken from here
    I am seeing these pop up on many, many vegan, vegetarian blogs. It was about time I had made one for myself. An amazing sandwich, served either for breakfast, lunch, a snack or even dinner. It is filling, wonderfully exotic tasting and simple to make.
    Ingredients:
    • 1 large banana
    • 1/4 cup unsweetened coconut
    • 3 tbsp vanilla fortified soy milk
    • 1 tbsp maple syrup
    • Homemade peanut butter or store bought
    • Ciabatta bun or store bought English muffins/bread loaves
    Directions:

    Toast the Ciabatta bun's/bread. Then in the bowl of an electric mixer (or you can certainly do this by hand), combing/mash together the banana, coconut, soy milk, and maple syrup. Combine until egg-y, if that makes sense. You want only a few lumps.

    Then in a small pan over medium heat, pour the banana mixture in and scramble until ever-so lightly browned.

    Divide into two equal portions. Spoon onto English muffins and spread the other side with peanut butter (to your liking). I found it helpful to lay out a piece of tin foil for mine -- because I quickly transported it to work with me.

    Pear and Goat Cheese Sandwich with Toasted Walnuts

    Recipe taken from here

    What a unique combination of flavours. I never think to put fruit in my sandwich, I just feel as though fruit is more of a salad topper. I was incredibly wrong though. This lent such a wonderful sweetness to the sandwich and created such a unique taste with the goat cheese and walnuts. This was such a refreshing sandwich and is certainly aimed to please. It is a reminder of the summer on a cold winter's day. Very satisfying.

    Ingredients:
    • 1 tsp extra-virgin olive oil
    • 1/2 tsp balsamic vinegar
    • Pinch of sea salt
    • Pinch of freshly ground black pepper
    • 1/4 cup mixed salad greens
    • 1 ounce goat cheese
    • 2 slices whole grain bread
    • 1 slice onion, separated into rings
    • 5 thin pear slices
    • 1/2 tsp chopped toasted walnuts
    Directions:
    Whisk together first 4 ingredients in a small bowl. Add salad greens, tossing to coat. Spread cheese on 1 slice of bread. Top with greens, onion, pear, walnuts and remaining slice of bread.

    Turkey Sandwich Extraordinaire
    Last but certainly not the last sandwich that will hit this blog. This was something I quickly whipped up after a run. I was craving something incredibly filling as you could probably tell. It was huge, delicious, healthy, and oh so tasty. I loved this.

    Ingredients:
    • 1 tomato
    • 4-6 cucumber slices
    • Broccoli sprouts
    • 2 large red chard leaves
    • 5 tofurkey slices
    • 1/2 avocado
    • 2 slices of honey poppy seed bread
    • Wasabi-lime mustard
    Directions:
    Whip up your sandwich in desired layers. Devour.

    Have a great day, and open up wide, as there is lots to choose from :)

    A Taste of Freshness.

    After yearssss of eating sushi, I have had my fair share of avocado experiences. However, it wasn't until last week when I made Avocado and Lemon Toast that I was beginning to understand what all the fuss with avocado was about. I mean for starters, it is honestly like natures butter. It is smoothe and spredable and you can taste the fat. It has a gorgeous colour (which always helps). And, eeep, it is tasty. Since my tastebuds were becoming more and more enamored by natures butter with each bite I knew that I would have to start adding it into my diet, especially seeing as I want to put on some weight. So on Sunday night, while I was writing down my meal schedules, I looked through my saved recipes from the week and found two recipes containing avocado's.

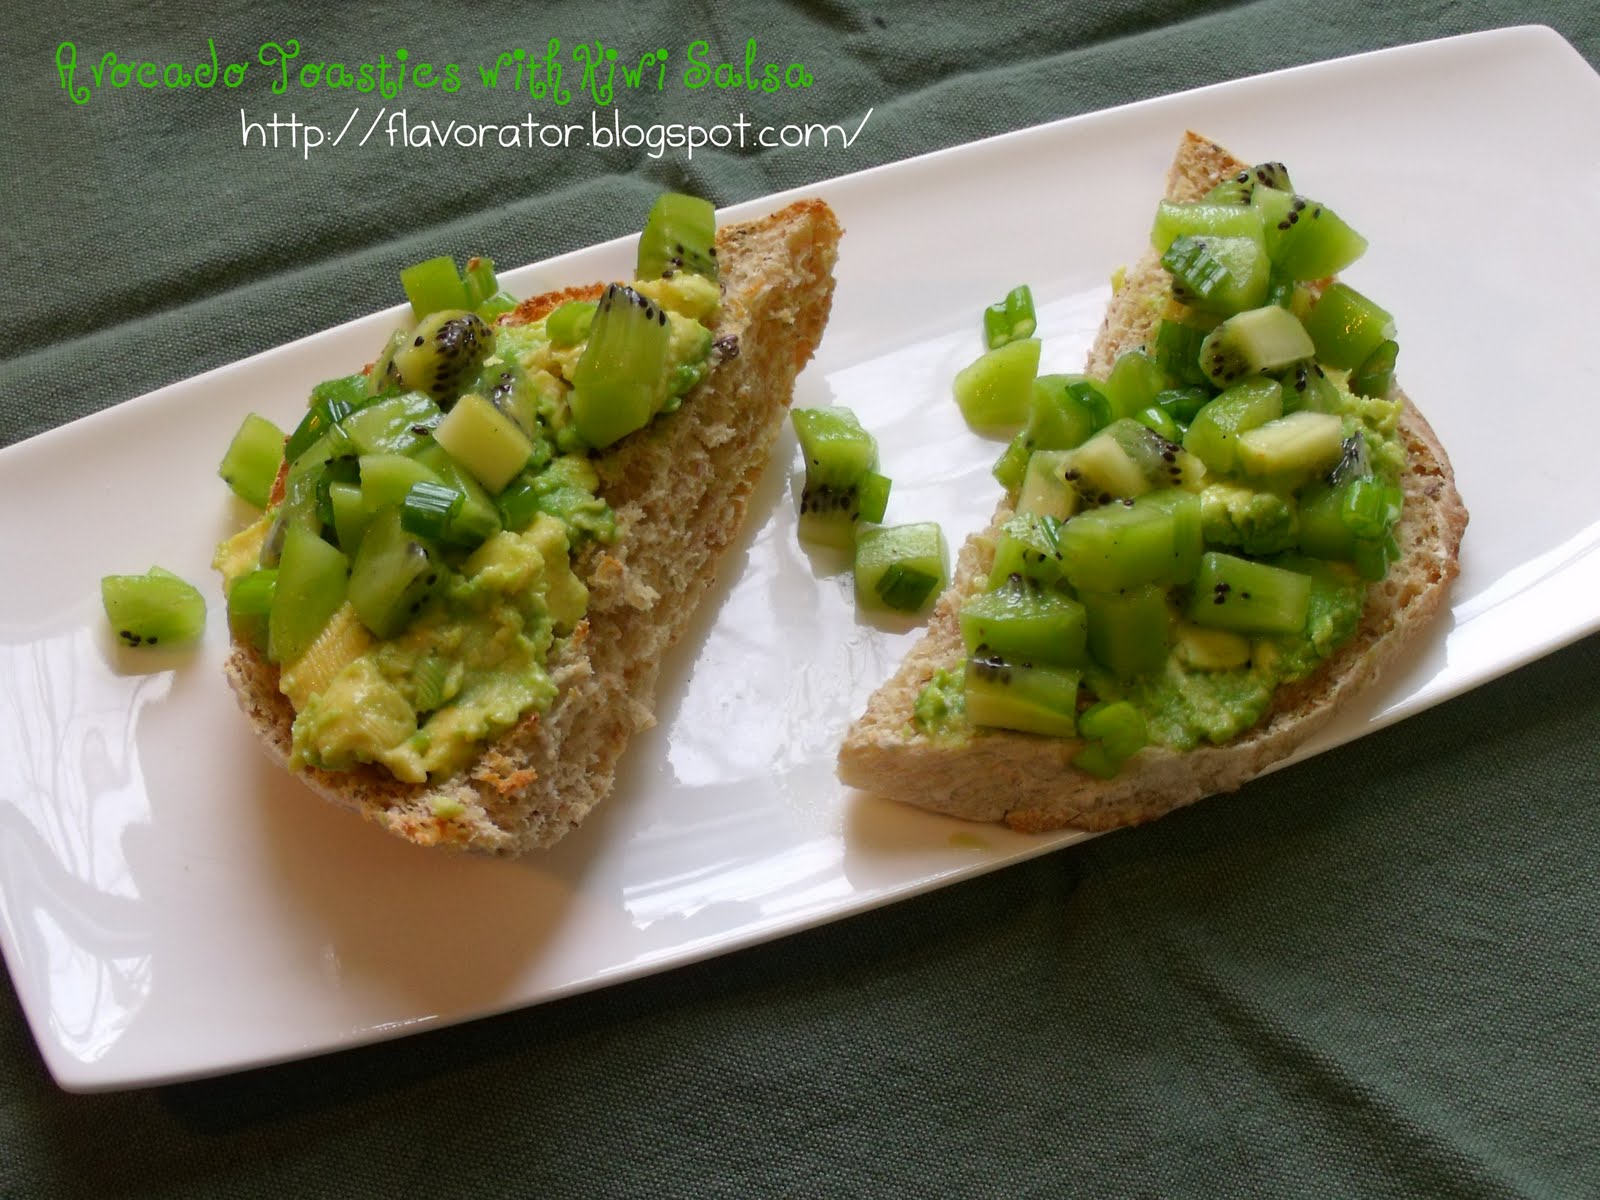
    Avocado Toasties with Kiwi Salsa


    The first recipe I made was for Avocado Toasties with Kiwi Salsa. Now, I changed the portions just a bit because someone in my house decided to only leave me with one kiwi... (I should of written touch and die on my kiwis, however and this I literally did... I wrote that on the bag with my orange and grapefruit... I'm nuts I know). Oh well, at least one was left, this allowed for more avocado truffles ;).

    I absolutely loved this little snackey-lunch. It was so fresh and brought me back to the summer. Each bite had a little zing with a bite of sweetness and a creamy mouthful. I would make this hands down over and over again. It's perfect. All ingredients, excluding avocado and kiwi are ingredients that you more or less should have around the house. Plus, yes there is fat in this snack (HOWEVER, it being GOOD fat) this was an all around healthy meal. I loveeed it. I even cut off another piece of lime to give it a touch more ziiiing.

    Ingredients:
    • 1 tbsp plus 2 tsp of fresh lime juice
    • 1 tsp honey
    • 3 large, peeled, cut into 1/4-inch cubes (about 1 1/2 cups)
    • 1/2 cup chopped fresh cilantro
    • 2 green onions, finely chopped
    • 2 tsp hot sauce
    • 1 slice of ciabatta bread or pain rustique, halved horizontally
    • 2 avocados, halved, pitted, peeled
    Directions:

    Whisk 1 tbsp lime juice and honey in medium bowl. Add kiwi cubes, cilantro, green onions, and hot sauce. Season kiwi salsa with salt; toss gently.

    Heat griddle over medium-high heat. Place 1 bread half, cut side down, on griddle. Cook until cut surface is crisp and brown in spots, 5 to 6 minutes. Repeat with second bread half.

    Mash avocado in medium bowl. Add remaining 2 tsp lime juice; season with salt and pepper.

    Cut each bread half crosswise into 4 rectangles. Spread each with about 3 tablespoonfuls mashed avocado. Top each with salsa.

    Avocado Truffles

    Recipe adapted from the link below.

    The other day when I had made the Nutty Goji Berry Power Balls I noticed myself craving them for dessert or after a power work out. Well, needless to say I ran out of those because I wasn't sure how they were going to come out at first so I didn't make that big of a batch. However, after having just one bite I knew that I should of made a much bigger batch. No worries, it is always possible to replicate and allowed me to make these Avocado Truffles, with some adjustments to match my palette. At first I was a little skeptical about these, because, well... the colour just wasn't pretty, no, that is an understatement, it looked awful. However, I have learn't that with some food you really musn't just it by its cover, sometimes the best of gems are sometimes hidden under disgusting greeny, gross looking colours. These truffles were so smoothe and delicious. Having these natural treats has seriously gotten me off of my ice cream and sweet kick. Where I would of craved ice cream or a cookie I simply open the freezer and pop one of these in my mouth. I have two a day and it really hits the spot. I'm really glad I found these and spruced them to how I enjoy my sweets. I will definitely make these again trying with different fruits and spices, yummy!

    Ingredients:
    • 1/2 cup ground almonds
    • 1/8 cup dried cranberries
    • 1/8 cup dried goji berries
    • 1/4 tsp ground cardamom
    • 2 tbsp honey/agave nectar
    • 1/2 ripe avocado
    • 3 pieces of milk covered pistachio chocolate
    • ~ 1/2 cup unsweetened flakes coconut
    Directions:

    Combine almonds, cranberries, goji berries and cardamom in a food processor. Blend until it becomes a fine meal. Add syrup and avocado and blend again until well combined.
    Form balls (size of the walnut) from the batter, (I let mine sit in the fridge for about an hour). Roll each ball in coconut or milk covered pistachio or cocoa powder for coating.
    Keep in airtight container in the fridge for up to three days. Freezes well.

    Yields 15-18 truffles

    Enjoy your healthy/easy/delicious snacks!

    White Sandwich Bread + Avocado and Lemon Toast + Brussels Sprouts with Toasted Breadcrumbs, Parmesan and Lemon Zest

    Hello everyone :),

    So I know we are only a few days into the new year, but as I had mentioned I am a very regimented person. I love making schedules, I love abiding by schedules, I love writing plans down for future schedules, I love it all. When I have it written, it makes me feel like I have something important to abide by. My new years resolution is no different, although it does not affect anyone else, well, not as much as it affects me, I love that I have something to follow.

    I’ve used my “rules” as being the holy word this week. I’ve been making meals for lunch and dinner and as of Saturday I intend to start making big full breakfasts once again, the past couple months I’ve simply been eating cereal and yoghurt, needless to say I’m at the point where I don’t want to see another tub of yoghurt or another box of cereal. I’ve already saved many oatmeal recipes, fruit recipes and some breakfast sandwiches, it’s not that I can’t create/think of them for myself, but again, this allows me to write it into my journal and plan my groceries and everything else instead of just going about it on a whim. With that being said, be on the look out for new breakfast ideas within the next little while.

    Every single say this week I have woken up and been excited for the day. I’d love to say that it’s been like that forever, but I’ve been struggling with that for a while now. However, with my resolution it’s made me look at food differently as to how I have in the past while (which… in time I feel as though I will be able to discuss it with you all).

    As I mentioned I want to incorporate more bread into my diet. Not only because it tastes’ absolutely delicious, but I can’t really eat store-bought bread so the past year unless I’ve made bread I’ve pretty much been deprived. However, this week having bread at my disposal has given me so much more opportunity with food. I can now make sandwiches, omelet’s with toast on the side, grilled cheeses’, eat it just as toast with butter and brown sugar brushed atop, oh the possibilities!

    I’ve been in absolute heaven, I mean… I may be almost going on the deep end, but I love everything about it, the smell, the taste, the feeling I get when I eat it. So, I want to become better at making bread (not that I’m horrid at it, but I’d love to make more difficult breads).

    I finished my French Onion Bread yesterday and I knew that I would want some sort of sandwich today so I went through my library of bookmarked bread pages and seeked what my palette wanted. I didn’t find anything, so I went to the Internet. I searched V8 breads. I made one… and, unfortunately I ate the whole loaf (I told you, I really went overboard). It was good, but it wasn’t sandwich bread, it was more of a chunky loaf than a hearty sandwich bread. I remembered seeing a recipe recently for a white sandwich bread loaf so I went back to Tastespotting and looked it up.

    I found the recipe and then headed for the kitchen. This was a super fun bread to make. The reason I say this is that I’ve never made sandwich bread so I wasn’t sure what to expect. I had to add flour because I found the bread way too sticky, however, I was kind of afraid of doing so because I had read on another loaf bread recipe “LADIES, it’s going to be sticky but whatever you do DO NOT add more flour” (something along those lines), therefore I was afraid it would apply to this recipe too. However, to my luck it did not!

    The bread turned out beautifully. It rose. It smelt like heaven. The butter brushed on top turned a golden yellow colour. It was sponge-like, and it was certainly sandwich making bread. It was so hard last night when I took the bread out of the oven at around 10:45 pm to not cut into it right away, but I had already eaten the whole loaf of V8 bread so I knew it wouldn’t be a wise decision and I would simply have to wait for lunch to enjoy it.

    White Sandwich Bread

    Recipe taken from here

    Ingredients:

    • 1 cup + 2 tbsp to 1 1/4 cups lukewarm water (about 105 degrees F)
    • 1 heaping tbsp honey
    • 2 1/4 tsp instant yeast
    • 1 3/4 tsp salt
    • 2 tbsp soft butter
    • 4 cups (17 ounces) AP Flour + 1/2-3/4 cup (since I used milk instead of milk granules)
    • 1 1/2 cup Vanilla Fortified Soy milk

    Directions:

    Mix all of the ingredients in the bowl of a stand or regular mixer with the flat paddle. Scrap off the sides, if necessary. Knead the dough for 10 minutes by hand or via a dough hook. Oil lightly a big bowl or use the same stand mixer bowl with a bit of oil in it (that's what I do!). Roll the bread around in the oil, and cover it with a towel or a shower cap. Allow dough to double in size for 60 to 90 minutes in a warm area.

    While the dough is rising, butter a loaf pan (my addition). Once the dough has risen, roll the dough out into a thick, rectangular shape on a pastry mat, Silpat, or wax paper. Roll the dough into a tight log the same length as the loaf pan you're using.

    Place the rolled log of dough into the loaf pan, cover it with a towel or shower cap, and allow it to rise 1 to 1 1/2 inches over the loaf pan in about 60 minutes. During the last 30 minutes of rising, preheat the oven to 350 degrees F.

    Once the dough has risen high enough, bake the bread for about 20 minutes. If it starts to get too brown on top, place foil over it and bake it for 10 more minutes. (So, a total of 30 minutes). The temperature of the dough should be between 195 and 200 degrees F.

    Butter the top of the bread. Then, allow the bread to cool before cutting into it.

    Avocado and Lemon Toast

    So wait I did. However, at 1:00pm I decided I had waited long enough. As much as I wanted a sandwich (which honestly for me is REALLY unusual… I’m not a sandwich person by all means. Honestly, sandwiches kind of creep me out. But, I think because I haven’t any “sandwich” bread in over a year I’ve just been going ravage for sandwiches). Today I decided to use up the avocado I bought on the weekend, which had finally softened. I added lemon juice, then topped it with sea salt and pepper. It was such an incredibly easy lunch to make (less than two minutes) and tasted like heaven. I’m really not an avocado person, I really only eat it if I have it in my sushi or the Crab and Avocado Salad however, seeing as I want to put on weight, it is perfect since it is high in polyunsaturated fats and is very healthy.

    The simple union of the above-mentioned ingredients made this weird textured fruit incredibly tasty and making me wanting to come back for more. Each bite, with the delicious flavours and the amazing bread made this simple “sandwich” (which I added with more food don’t worry) was an absolutely fantastic lunch. I would definitely make this again, despite my lack of love for avocado.

    Ingredients:

    • 2 slices of bread
    • 1 avocado, sliced thinly
    • Sea salt and pepper to taste
    • Freshly squeezed lemon juice to taste

    Directions:

    Toast your bread. While the bread is toasting, slice your avocados. When the bread has done toasting, spread the avocados on the toast and sprinkle the sea salt, pepper and lemon juice.

    Eat up and enjoy!

    In my last post, I believe I mentioned how I had given brussels sprouts another chance while at my dads girlfriends house for Christmas dinner. Since I had shared this knowledge with my mother she thought it would be nice to buy two very large packs of Brussels sprouts, so the other night I made Brussels Sprouts and Shiitake Mushrooms and last night I searched for a recipe that would spark my attention, which I definitely found. After having my amazing lunch I was looking even more forward to dinner now.

    When five o’clock rolled around (I know, I ate lunch at 1 and was already eating at 5, I don’t space out my meals by much, but I like it better this way because then in the evening I drink a lot more lemon water to cleanse myself from the day… which I’m currently doing as I write this).

    I made the Brussels and holy moly were they ever good. I was seriously popping them like candy. Thinking back to the first time I had Brussels sprouts I didn’t think I would ever use the statement “like candy” and Brussels sprouts in the same sentence, but these were so good! I used Panko breadcrumbs, much more lemon zest than stated, also less Parmesan than stated and it was absolutely brilliant. I love this. I’ve never had Brussels sprouts in the pan either (… not like I am a hero with this vegetable since this was only my forth time, yes so few times that I can actually recall how many times I’ve had it) but it was only my forth time, but this was by far my favourite.

    Having it made this way is definitely going to be my go-to method for when I make them in the future. I loved them, I couldn’t get enough of them, and hope that you will try them out, if not this than hopefully one of the above recipes!

    Brussels Sprouts with Toasted Breadcrumbs, Parmesan, Parmesan and Lemon Zest

    Recipe taken from here

    Ingredients:
    • 1 pound brussels sprouts
    • 3 tbsp toasted breadcrumbs (instructions below)
    • 2 tbsp finely grated Parmesan cheese
    • 2 tsp lemon zest
    • 1/2 tsp finely ground black pepper
    • 1/4 tsp sea salt
    • 1/2 tbsp butter
    Directions:

    To make breadcrumbs: Use the remains of an old baguette. Chop or break into pieces with a sharp knife. Process in the food processor until you have the texture of breadcrumb you desire. To toast them you can either use a toaster oven at 300 degrees until golden brown (this should only take a few minutes), or brown them in a pan. If using a pan, stir frequently so that they don’t burn.

    Rinse Brussels sprouts. Remove stems and slice each Brussels sprout in half lengthwise.

    Warm a skillet over a medium flame. Melt the butter for a minute or two in the pan. When everything is nice and hot, add the Brussels sprouts. Stir to coat them evenly with butter, then turn all of them so that the cut side is facing down. You will want to cook them for about twenty minutes, and as long as your heat is not too high, you will only need to stir them about three times. When you do stir them, turn down any that are facing up after stirring.

    While the Brussels sprouts are browning, mix together the breadcrumbs, Parmesan, salt and pepper with a fork. Add the lemon zest last – it may clump a little, so break it up with the fork if necessary.

    When the Brussels sprouts are cooked – tender, with a darker shade of green and nicely caramelized edges – transfer them to a glass bowl. Toss them in the breadcrumb mixture and stir to coat.

    Serve hot.